Triang Ultra Modern No.50
Introduction to Triang Ultra Modern No.50

‘Ultra modern design with opening front. Movable suntrap. Two rooms fitted with electric wall lights, fireplaces and metal framed windows. Opening front door with staircase. Built-in-garage, with opening doors. Finished in cream and green,’ Length 21 ins
A new addition to my collection, [Christmas Present 2018]. This Triang Ultra Modern No.50 has been completely overpainted in a lovely dark mustard colour, with red metal framed windows [they are fitted with real glass].

There is an entrance hall with a door leading into the ground floor room and a staircase. The staircase goes up onto the landing, with a door opening into the first floor room, and another door leading into a first floor sun lounge. There is also an internal garage.

I will need to make some new garage doors, as they are missing.

This metal and glass window is on the side of the house, the staircase can be seen through the window.

This view shows the first floor internal sun lounge.

This house is fitted with battery operated lights. The light bulbs fitted in bulb holders are linked by thin wire, and can be turned on and off, when the metal bar on the outside of the house completes the circuit. The power is provided by batteries stored in the roof space.

The little green front door with a letter box, a broken door knocker, and no door knob. [You will have to knock hard if you want to go in….]

You will notice that the door is bigger that the hole for the door, the door is mounted on a piece of wood [see picture below]. I have checked this is correct for this model of dollshouse.

The front opening panel is hinged on the wrong side. It is probably because the wood is damaged, but this can be sorted out, and the hinges mounted slightly lower than they were originally.

This is the bottom window, made up of three sections, attached with small nails.

Top window.

Ground floor entrance, with the stairs going up to the first floor. I like the carpet on the staircase, but it is very worn.


Both rooms have original floor paper. The original Triang fireplace in this room has not touched, but the one on the ground floor has been overpainted with the same colour paint as the house.

The landing at the top of the stairs, with a view of the window. This house would not have had any wallpaper when new, so therefore none of the wallpaper is Triang.

The garage has original Triang brick patterned paper, but as you can see has a lot of paint on it.

This is the first floor sunlounge, with brick floor paper, as in the garage, it has paint splatters on it.

The Ultra Modern House has a sun roof, it should have a removable sun trap, but it is missing. I am planning to display my Triang Garden on the sun roof.
Triang Fireplaces
There are two original fireplaces in this house.

The fireplace in the top room has not been overpainted, it came away from the wall very easily. The fire effect is actually fixed onto the wall with very gunky thick glue.

The fireplace in the ground floor room has been overpainted, there is also paint on the fire printed paper.

These fireplaces are very roughly made, no neat sanding or finish.

Back view. The side pieces were cut out of a single block with the steps up to the top, and recesses cut out at the front.

So why if you are going to cut a piece of wood so accurately, would you not sand and paint it neatly.
Front Door

The front door is a bit of a mess, but noting that can’t be sorted. The hinges need cleaning, they were easy to remove as they were fixed with tiny screws. The door knocker is broken, and the door handle is missing. The letter box will get a good polish.


Now the door has a nice coat of green paint, and the door furniture polished.
Windows


The metal window frames are fitted to the house, with small metal nails.

As the front opening panel of the house is made from ply wood, the nails that are used to hold the frames in place are often bent over. I lifted the end of the bent nail gently with a thin blade, so I wouldn’t damage the wood. The bent part of the nail was then snipped off.

It was then easy to leaver the nail from the front. To be honest these windows had been removed before so the nails were quite loose.

The glass is held in place with small nails.

Frame with nails removed.

[Cheating here, added a bit of blu tac to hold glass together while taking the picture].

Glass removed, it was easier to remove the windows etc. in this order, as the nails holding in the glass were quite difficult to remove.

If this is the original glass, it has been cut very roughly, and quite dangerous for a childs toy. [Who ever lived in this house did not clean their windows very often.]


Windows and glass removed. I have labeled each one so they can go back in the same frame.

The window frames have now been stripped of old and new paint, taking them down to bare metal. Some have a slight bends in so I will gently tap them back into shape before painting.

This is the spray paint I am going to use for the window frames, the colour is Forest Green.

For the first coat of paint, I have hung the frames outside on a piece of string.

Each metal window pain was then sprayed, unfortunately it was a little windy and most of the paint seemed to miss the windows altogether.

The frames have been left for about a week, then sanded and a second coat of paint applied.

So the windows would not stick to the cardboard, I made little pads for them to stand on. Using two small pieces of foam board with a nail through them, the nails could be put into the holes in the corners.
Dismantling
The easiest way for me to start stripping and sanding this house is to disassemble it, as it has been painted with a mustard gloss paint.

The front panel has been taken off by removing the hinges.


The front window panel has been separated from the door panel, it is easier to get inside this way.

There are also signs of dark green gloss on this panel. there was also some on the roof when I started to remove the paint.

The little roof on the top left hand side has also been removed, so I can get into the little sun roof.

With a little bit of persuading the stairs were removed.

You can see the nails in the wall that held the stairs.
Sanding
Now to get down to the job of removing the paint. It had been painted with gloss paint, normally I can remove it with a sharp blade, but not this paint. I had to use paint stripper … which I hate. As for the green paint, it just turned to mush. I tried to sand it off, but that did not work, just made things worse. It was a very slow process, as it was best to let the wood settle between applications of stripper. The paint stripper tends to soften the wood, which is not good on a house of this age.

I did remove the little roof section on the left, it made it easier to get to the little garden room. Also there was some repair work to do in this area.

The front panel was also removed, as it was very difficult to get in all the areas where the paint needed to be removed from.


With the little box part of the front panel removed it was easy to get to all the areas, there was even green paint here too.
 The house has now had its first sanding, just needs to be checked over…..
Clamping and Glueing
Now the first stage of standing is finished, it is now time to do a bit of glueing and clamping.

The main parts needing repair is where the small roof was removed above the garage.

One piece was splitting around the front, the wood was very dry, probably due to its age.

All glued and clamped, just have to wait for the glue to dry.

There was a split in the wood just behind the door, so I have stuck and clamped it. Hopefully it will flatten out.

Once I had removed the paint, and sanded, the front side panel had a gap. I cleaned out the space between the two panels, and glued and clamped them together.
Wood Filling

I have used Ronseal Multi Purpose Wood Filler, to repair any damaged wooden areas which need filling. It is good for repairing small areas, and is easy to apply.

The front panel on this house had been fixed on the opposite side, this could be because the original panel was damaged down one side. I can mount the new hinges in a difference part of the panel.

I have filled the damaged area with wood filler, this will be sanded flat when it is dry.

Filling repair has also been needed to the top of this panel, this was where the old hinges had been fitted.

The small roof panel needed repairing.

Painting

The base has been sanded, and the wallpaper removed. As I had to buy a whole can of green spray paint to do the window frames, it seemed a good idea to use it on the base of the house.

The house has been masked off along the edges of the rooms, and then covered with paper to protect the rest of the house. [I knew I would find a use for that awful wood chip wallpaper.] This is a very messy process, especially when I am involved.


The spray paint I used was made by ‘Plasti Kote’, the colour was Forest Green. It is meant to be used on metal, but worked well on the wood, it was easy to apply giving an even coat.

As you can see from the picture above painting is now complete, inside and out. It has taken me a long time and many coats of Soft Cream Silk Paint.


Very slowly, this lovely little house is coming back to life. As shown in the pictures above the rooms have been painted, but I was not happy with the finish on the walls. They were a bit rough, so I bought some coloured card, the result has given a much better finish.
Nearly There ….
The Triang Ultra Modern No.50 is just about complete, apart from fitting the hinges, and some new garage doors.


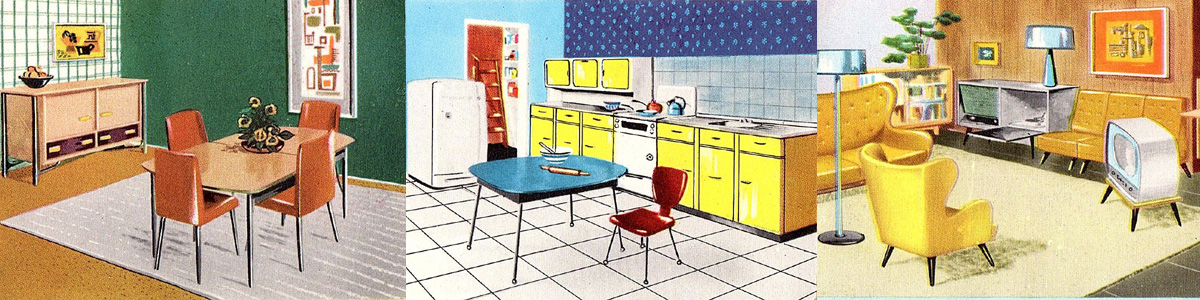
The rooms are filled with some nice bright Triang furniture, with some sweet little plastic plants. The radiogram is not staying in the garage, left it there by accident.

The floor paper is brown, but has come out a lighter colour in the picture, I also have to make a backing for the fireplace. I need to cut circles in the wallpaper, so I can put in the lights.

There is a Lundby silver Tea Set on the sideboard.

The stairs need some new carpet, and the wallpaper looks a bit wonky …. note to self [tidy it up].